In this lesson
A barre, also written “bar”, uses one finger to fret two or more strings at the same fret. A full barre spans all six strings; a partial barre covers fewer. The movable major-chord shapes in this lesson use the index finger for the barre.
Use standard tuning: low E, A, D, G, B, high e. Start with familiar open chords. In the shapes below, finger 1 is index, 2 middle, 3 ring and 4 little. Read the chord-diagram guide if the dots and string markings are unfamiliar.
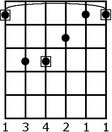
In these diagrams, numbered dots show fingers, squares mark root notes and the thick horizontal band shows the index-finger barre. Fret numbers appear on the left. Read the strings from low E on the left to high e on the right.
Move the E-major shape to G major
An open E-major chord uses the frets 0–2–2–1–0–0, from low E to high e. Here, 0 means an open string.
- Refinger open E with ring on A-string fret 2, little on D-string fret 2 and middle on G-string fret 1. Leave the index free.
- Move those three fingers three frets towards the body: ring to A5, little to D5 and middle to G4.
- Place the index across fret 3, supplying G on low E and the notes on B and high e.
- Pick all six strings separately, then strum them together.

At fret 3, this E-major-derived shape is G major: low E to high e, 3–5–5–4–3–3. Its notes are G, D, G, B, D, G. The diagram’s finger numbers are 1–3–4–2–1–1.
It has the same G-major chord identity as an open G chord, with a different voicing: the notes are arranged and doubled differently.
Find the root before moving the shape
The root names the chord. In this E-derived shape, find it on low E under the barre: fret 3 is G, fret 5 is A and fret 8 is C. Moving the complete shape to fret 8 gives C major, 8–10–10–9–8–8.
The lowest sounding note is called the bass. It is the root in the four pictured shapes as used here, but other chord voicings can put a different chord member in the bass. Do not use “lowest note equals root” as a rule for every chord.
Moving a shape means moving every sounding position by the same number of frets. The barre takes over the notes that were open in the original shape.
A-major shape: use this fingering

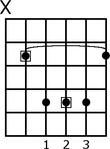
For the full five-string voicing shown, use fingers 2, 3, 4 on D, G and B and keep finger 1 at the barre.
For example, place the barre at fret 2 to play B major:
| String | Fret | Finger |
|---|---|---|
| Low E | Omit | Keep silent |
| A | 2 | Index barre, 1 |
| D | 4 | Middle, 2 |
| G | 4 | Ring, 3 |
| B | 4 | Little, 4 |
| High e | 2 | Index barre, 1 |
Fret 2 is the example chosen here. Its root is B on A-string fret 2. Play from A through high e and leave low E silent.
An alternative is to fret D, G and B with a ring-finger partial barre. If that grip mutes high e, omit that string: the four remaining notes still form B major. That is a different voicing from the five-string diagram.
The C- and G-derived shapes
These shapes involve wider reaches. Use the exact string choices below, and start with the E-derived shape if these stretches are not comfortable.

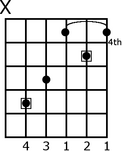
The C-derived shape shown sounds E major, omit–7–6–4–5–4, from low E to high e. Use little on A7, ring on D6, index on G4 and high e4, and middle on B5. The root is E on A7. Leave low E unplayed.

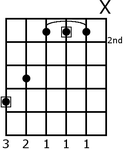
The G-derived shape shown sounds A major, 5–4–2–2–2–omit. Use ring on low E5, middle on A4 and an index barre across D, G and B at fret 2. The root is A on low E5. Omit high e, as the diagram’s X requires.
“E shape”, “A shape”, “C shape” and “G shape” describe the open-chord patterns they come from. The root and fret position determine the sounding chord name.
Original chord drawings
The historical E-shape drawing, A-shape drawing, C-shape drawing and G-shape drawing are preserved for reference. The old A-shape drawing has no absolute fret label and labels the three upper fingers 1, 2, 3; use the fingering in this lesson, which leaves finger 1 free for the barre.
Check a barre without forcing it
Place the barre close behind the fret wire and pick the intended strings one at a time. If a string buzzes or stays muted, adjust the finger position before adding pressure. A small change along or across the finger can move a string away from a joint crease.
The E-shape steps above put the other fingers down before the barre. You can also practise placing the barre first. Use the order that helps you assemble the shape accurately; there is no required finger-placement order for every chord change.
For a short practice, form G major at fret 3, pick each string, release the pressure and rest. Repeat, then try the E-derived A-major chord at fret 5: 5–7–7–6–5–5. Use brief attempts and stop if the position hurts. Barre-chord alternatives provide smaller shapes while you work on the full grip.
Further reading: StringKick’s barre placement and movable shapes and Open Music Theory’s chord roots and bass notes.