A power chord contains a root and a perfect fifth above it, often with the root repeated an octave higher. Chord symbols use the root name followed by 5: F♯5, D5, C♯5 and B5 are the four examples below.
There is no third in this shape, so the power chord itself is neither major nor minor. It can be played on acoustic or electric guitar.
Read the four shapes
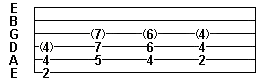
These examples use standard tuning. Read the strings below from low E to high e. A dash means leave the string unplayed; parentheses mark the optional upper root in this particular tab.
| Power chord | Low E | A | D | G | B | High e | Pitches |
|---|---|---|---|---|---|---|---|
| F♯5 | 2 | 4 | (4) | — | — | — | F♯, C♯, optional upper F♯ |
| D5 | — | 5 | 7 | (7) | — | — | D, A, optional upper D |
| C♯5 | — | 4 | 6 | (6) | — | — | C♯, G♯, optional upper C♯ |
| B5 | — | 2 | 4 | (4) | — | — | B, F♯, optional upper B |
The first shape has its root on low E. The other three have their root on A. On these two string pairs in standard tuning, the fifth is on the next thinner string, two frets higher. The optional octave is one string thinner again, at the same fret as the fifth.
This pattern needs adjustment on some other string pairs or in a different tuning. Keep this lesson’s shape on the low-E/A or A/D pair. The tablature guide explains why notes stacked vertically are played together.
Choose a fingering
For F♯5, put the index finger on low E fret 2 and the ring finger on A fret 4. Add the little finger on D fret 4 for the upper F♯.
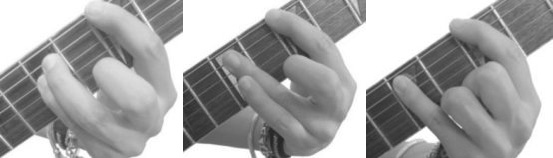
The three photographs show alternative grips: index, ring and little fingers; index with ring finger covering the two upper notes; and index with little finger covering them. Choose a grip that lets the intended strings sound and leaves the hand ready to move. The unused fingers do not need to copy the curled poses in the photographs.
For the A-string-root shapes, move the grip across one string. Leave low E unplayed as well as the strings above the chord.
Keep unwanted strings quiet
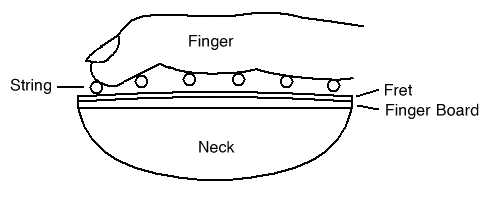
The cross-section drawing shows one finger fretting a string while touching neighbouring strings. For these shapes, fret the root firmly enough to sound it, while using light contact on unwanted strings to damp them. Do not press those unwanted strings into a full chord.
On an A-string-root shape, the tip of the index finger can touch low E while the rest of the hand helps damp the thinner unused strings. Check each string before strumming; a useful grip must let the chord notes ring and keep the omitted strings quiet. The dead-note lesson explains light contact.
A short practice sequence
Play the four positions in the table in order, once each on a slow count: F♯5, D5, C♯5, B5. Pause to reset, then repeat. The tab supplies no rhythm; one chord per count is a practice choice.
Start with two strings per chord, then add the optional octaves. Keep the distances within the grip as you move, and check the root string at each change. When the notes are clear, use palm muting to shorten their sustain.
Further reading: Patrick MacFarlane’s two- and three-string power chords and Open Music Theory’s root, third and fifth.