In this lesson
A bend raises a note’s pitch by stretching the string sideways while it remains fretted. The distance the string moves is only a means of reaching the pitch you want. A half-step bend raises the note by one semitone; a whole-step bend raises it by two.
Start with a tuned guitar and a comfortable amplified or acoustic volume. If bending takes excessive effort, reduce the target interval or ask a teacher or technician to check your approach and setup. String gauge and guitar setup affect the feel. Stop if you feel pain.
Choose a direction and support the finger
Move across the fingerboard in a direction that leaves room for the string. Near an outside edge, bend towards the centre so the string does not slip off. Both directions can raise pitch. Instructions such as clockwise or towards the floor change with the playing orientation and viewing angle.
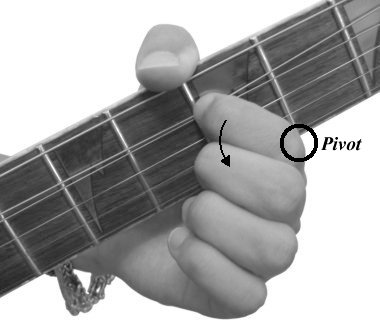
Keep the sounding finger close behind the fret. Try a small coordinated hand and forearm movement while maintaining contact with the string. Your thumb can help support the hand, but avoid clamping the neck or forcing a fixed wrist position.
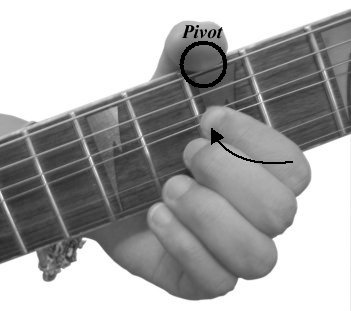
When bending with the ring finger, the index and middle fingers can support the same string at lower frets. They move with the sounding finger. Support is useful in either direction when the position allows it. Keep adjacent strings quiet with light unused-finger or picking-hand contact.
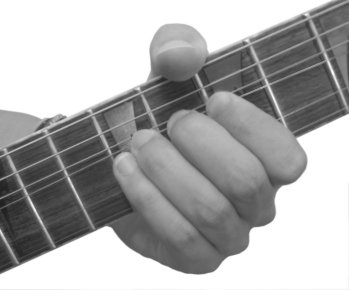
Practise against a target note
In standard tuning, play the eighth fret on the B string, G, and listen. Then fret the seventh fret, F sharp, and bend until it matches that G. Keep the finger at the seventh fret throughout the bend. Mute before returning the string if you want to hear only the rise.
For a bend and release, let the pitch fall back to F sharp while the note still rings. Keep control as the string returns; suddenly letting go can sound other strings. Repeat with a pause between attempts. You can use the tuner as a supplementary pitch check, but the target note gives you an audible comparison.
Bend, release and pre-bend
| Instruction | What to do |
|---|---|
| Bend | Pick a fretted note, then raise its pitch to the target. |
| Bend and release | Pick, raise the pitch, then return to the starting pitch while it rings. |
| Pre-bend | Move the string to the bent position before picking it. |
| Pre-bend and release | Pick the already bent string, then lower it to the unbent pitch. The original lesson calls this a reverse bend. |
Arrows with ½ or full commonly mean a semitone or whole tone. These labels describe pitch, not a fraction of the string’s width. Plain-text tabs often use b for bend and r for release. Check the tab’s legend when the target is unclear. Yamaha’s bending guide explains these markings; Hub Guitar’s overview discusses supporting fingers and different bend types.
Original notation and recordings
These examples are retained from the original lesson. The separate target-note exercise above is not a transcription of these recordings.
Bend
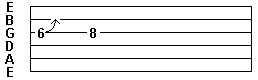
The image’s G-string 6 bends to the pitch of fret 8. In standard tuning that is C sharp to D sharp, a whole tone. Keep the finger at fret 6; the 8 gives the target pitch, not a new fretting position. The image supplies no rhythm.
Bend and release
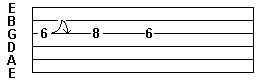
Here G-string fret 6 bends to the fret-8-equivalent pitch and returns: C sharp, D sharp, C sharp. Keep the same fretting position as the arch rises and falls.
Pre-bend and release
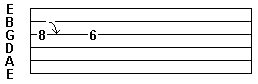
For this descending 8-to-6 pitch route, fret the G string at 6 and silently bend to the pitch of fret 8 before picking. Pick the bent D sharp, then release to C sharp. It is a pre-bend and release, not a fretted slide from 8 to 6.
Once you can reach and release a target pitch, try the smaller repeated changes in the vibrato lesson.