In this lesson
Fingerpicking uses your thumb and fingers to pluck strings. For this first pattern, use your thumb for a bass note, then index, middle and ring for the G, B and high E strings. Play one note on each count: 1 2 3 4.
You will learn the pattern on E minor (Em), stop, then try it on A minor (Am). Each example is a separate one-bar exercise. The aim is to find the intended string and keep four even plucks while the chord notes ring together.
Use standard tuning, E A D G B E from string 6 to string 1, without a capo. String 6 is low E; string 1 is high E. Check the tuning guide, first chord shapes and tab guide if those are new.
Read p, i, m and a
The letters identify fingers of your picking hand, whichever hand that is for you:
| Letter | Picking finger | Job in these examples |
|---|---|---|
| p | Thumb | Low E for Em; A for Am |
| i | Index | G string, string 3 |
| m | Middle | B string, string 2 |
| a | Ring | High E, string 1 |
The letters come from the Spanish names pulgar, índice, medio and anular. A p beside a tab note means use your thumb to pluck it. The tab number still tells you the fret. Picking-hand letters are different from the finger numbers in the chord diagrams, which identify the fretting hand.
This string assignment gives you a starting pattern. It is not a rule for every piece: the thumb and fingers can have other jobs when the music needs them. This exercise has one bass pluck followed by three higher notes; it does not teach an alternating-thumb Travis-picking pattern.
Find the strings before adding a beat
Set the pick aside. Support the guitar so your picking hand can reach the strings without gripping the instrument in place. Find low E with your thumb, G with index, B with middle and high E with ring.
Pluck the four strings separately in that order. Leave a pause if you need one to find the next string. Use a small, controlled movement and avoid pulling the string far away from the guitar’s body. Let a played string continue ringing while another finger plucks its own string; placing a finger back on a vibrating string stops that note.
Listen for four separate starts. If two notes sound together, slow down and identify which finger is moving early. If an unwanted string sounds, check where the finger begins and where it finishes. Pause to release unnecessary tension; stop if playing hurts.
Play one bar on E minor
Form the Em shape below. Read the compact pattern from low E to high E: 0 2 2 0 0 0. The diagram’s small numbers are fretting fingers.
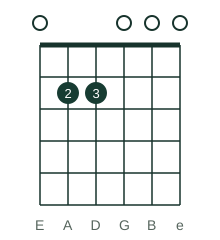
The four strings you pluck are all open, so you can first practise them with your fretting hand relaxed. Holding the full Em grip is an optional way to connect the pattern to the chord shape; A and D are fretted but not plucked here.
| Count | Finger | String and fret | Sounding note |
|---|---|---|---|
| 1 | p, thumb | Low E, string 6 open | E2 |
| 2 | i, index | G, string 3 open | G3 |
| 3 | m, middle | B, string 2 open | B3 |
| 4 | a, ring | High E, string 1 open | E4 |
Count a full empty bar, 1 2 3 4, then begin on the next 1. Pluck one note on each number. Keep the gaps between plucks even and let the notes overlap. The score’s let ring instruction allows a note to continue beyond its written quarter-note step; the steps show the four pluck times.
Em: first p-i-m-a pattern: score and practice
Separate one-bar Em exercise. Pluck open low E, then G, B and high E on 1, 2, 3 and 4 with thumb, index, middle and ring. Let the notes ring together; stop all four sounding strings on the following 1, or restart the thumb there if repeating. Four attacks, four beats; no count-in bar.
The score contains 1 played bar at 60 BPM, without a count-in. Follow the lesson's count-in and stopping instructions when you play. The guitar staff uses the usual octave-transposing treble convention; the tab gives the physical string and fret.
The static score is available without loading the player.
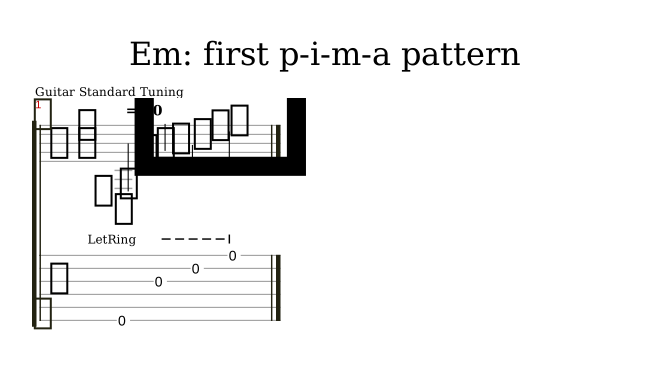
Scroll sideways for the complete score. Interactive notation loads when you ask for it. Practice audio loads separately and starts only after Play. Synthetic audio is a timing reference; it does not check your guitar or replace the instructions for stopping the strings.
After plucking high E on 4, let it ring for that beat. On the following 1, gently touch the four sounding strings to stop them, without another pluck. One pass has four attacks and four beats. The optional player contains no count-in bar. Select “Repeat this 1-bar score” only if you want it to repeat; when playing along, pluck low E on the following 1 instead of making the final stop.
The octave numbers name sounding pitches, with middle C called C4. E2 and E4 are two octaves apart. The repeated E still belongs to the same Em chord, whose different note names are E, G and B.
Try the same finger order on A minor
Stop the Em example before changing shape. Form Am, x 0 2 2 1 0, and check its notes without a beat. Leave low E out.
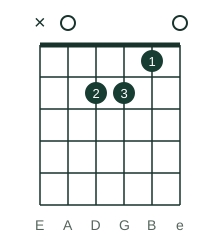
The thumb now starts on A, string 5. Index, middle and ring still pluck G, B and high E, but the fretted chord changes the G-string note to A and the B-string note to C.
| Count | Finger | String and fret | Sounding note |
|---|---|---|---|
| 1 | p, thumb | A, string 5 open | A2 |
| 2 | i, index | G, string 3 fret 2 | A3 |
| 3 | m, middle | B, string 2 fret 1 | C4 |
| 4 | a, ring | High E, string 1 open | E4 |
Count a fresh empty bar before starting. Use the same four evenly spaced plucks and let-ring instruction. Hold the Am shape while the notes sound; lifting a fretting finger early can stop its note or expose the open string.
Am: first p-i-m-a pattern: score and practice
Separate one-bar Am exercise. Pluck open A, then G, B and high E on 1, 2, 3 and 4 with thumb, index, middle and ring. Let the notes ring together; stop all four sounding strings on the following 1, or restart the thumb there if repeating. Four attacks, four beats; no count-in bar.
The score contains 1 played bar at 60 BPM, without a count-in. Follow the lesson's count-in and stopping instructions when you play. The guitar staff uses the usual octave-transposing treble convention; the tab gives the physical string and fret.
The static score is available without loading the player.
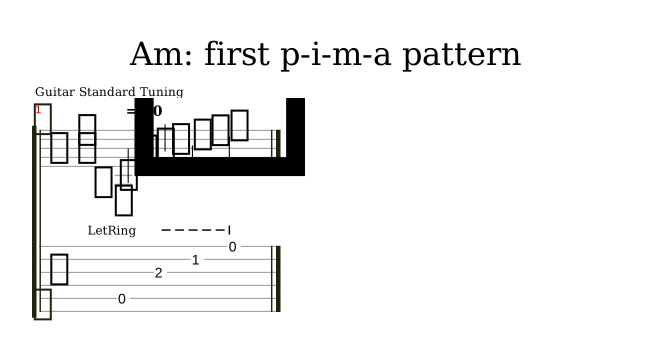
Scroll sideways for the complete score. Interactive notation loads when you ask for it. Practice audio loads separately and starts only after Play. Synthetic audio is a timing reference; it does not check your guitar or replace the instructions for stopping the strings.
Again, pluck on 1, 2, 3 and 4, then stop all four sounding strings on the following 1. There are four attacks and four beats. If you select “Repeat this 1-bar score”, restart with the A-string thumb pluck on that following 1. There is no extra count-in bar. These two scores are separate exercises, so switching between them is not a timed chord change.
Use the metronome with four beats per bar when the movement is manageable. Each click marks a numbered beat. The scores use 60 BPM, one second per beat; choose a slower setting if you need more time. The synthetic player gives a timing and note reference. It cannot check your picking fingers or tell you when your own strings have stopped.
Check the pattern
- Which picking finger does
aidentify? - Which string changes for the thumb between these Em and Am examples?
- Does the tab number 2 mean use picking finger number 2?
- How many plucks and beats are in either one-bar example?
- What do you do on the 1 after the final high-E pluck if you are finishing?
Check your answers
- Ring finger of the picking hand.
- Low E, string 6, for Em becomes A, string 5, for Am.
- No. It means fret 2 on the indicated string; the picking-finger letter is separate.
- Four plucks, one on each of four beats.
- Stop the four sounding strings without another pluck. If repeating instead, restart the pattern’s thumb note on that 1.
When each example is comfortable, practise moving from Em to Am without a beat before trying a continuous fingerpicked change. Use the chord-change method to check the shapes, then add a count. Its worked example uses Am and C, and you can apply the same method to this pair. The practice routine helps you make room for a short picking task, and chord-tone melody gives you a different way to choose and play chord notes.
Source notes
Kenny Baker’s Yamaha article The Basics of Teaching Classical Guitar, under “Rest Stroke”, gives the p-i-m-a names. Fender’s How to Play Classic Country on Guitar, under “Fingerpicking & Travis Picking”, describes the starting thumb/bass and finger/treble-string assignment. The two counted exercises, pitch derivations and stopping instructions were written for this lesson. No source music, video or artwork is reproduced.