In this lesson
A 12-bar blues is a repeating chord form twelve bars long. In the E-blues version here, play E7 for bars 1 to 4, A7 for 5 and 6, E7 for 7 and 8, then B7, A7, E7 and B7 for bars 9 to 12. Each bar has four quarter-note beats. The final B7 leads back to E7 at the beginning.
Start with one downstrum on beat 1 of each bar and let it ring through 2, 3 and 4. One pass has twelve chord attacks and 48 beats. This practice arrangement keeps the rhythm simple so you can learn where the changes happen; it does not teach a shuffle rhythm or reproduce a song.
Use standard tuning, E A D G B E from string 6 to string 1, without a capo. You should be able to count four steady beats and form open chords. Read the chord-diagram guide and bars and time signatures if those are new.
Follow twelve bars, not twelve beats
Read the chart left to right across each row, then move down to the next row. Every numbered box is a complete four-beat bar, even when its chord is the same as the box before it. Three rows of four bars make one twelve-bar pass, often called a chorus in blues playing.
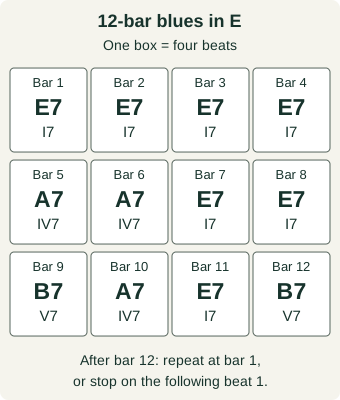
The Roman numerals name the chord roots in relation to E: I is E, IV is A and V is B. Count E, F♯, G♯, A and B to find those first, fourth and fifth scale positions. The 7 suffix makes each chord a dominant seventh: a root, major third, perfect fifth and minor seventh.
These three dominant-seventh chords are not all built entirely from the E major scale. E7 contains D and A7 contains G, while E major has D♯ and G♯. The numerals track the roots while each full chord symbol specifies its notes. The seventh-chord lesson explains why a plain 7 differs from maj7 and m7.
Learn E7, A7 and B7 separately
Read each pattern from low E to high E. A number is a fret, 0 means open and x means leave that string out. The small numbers inside the diagram dots are fretting fingers: index 1, middle 2, ring 3 and little 4.
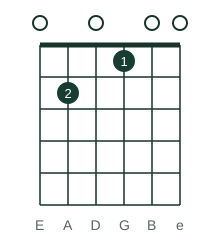
0 2 0 1 0 0.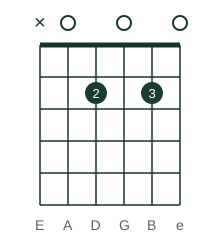
x 0 2 0 2 0.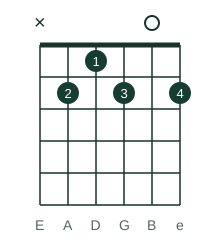
x 2 1 2 0 2.For E7, 0 2 0 1 0 0, put middle on A-string fret 2 and index on G-string fret 1. Strum all six strings. Leave D open; fretting D at 2 instead gives the ordinary E-major grip.
For A7, x 0 2 0 2 0, put middle on D-string fret 2 and ring on B-string fret 2. Strum A through high E, leaving low E silent. Keep G open: its G note supplies the minor seventh.
For B7, x 2 1 2 0 2, put middle on A-string fret 2, index on D-string fret 1, ring on G-string fret 2 and little on high-E fret 2. Leave B open and low E silent. Strum A through high E. This grip needs four fretting fingers, so give it separate practice before trying the whole form.
| Chord | Different chord notes | Sounding pitches, lowest played string upwards |
|---|---|---|
| E7 | E, G♯, B, D | E2, B2, D3, G♯3, B3, E4 |
| A7 | A, C♯, E, G | A2, E3, G3, C♯4, E4 |
| B7 | B, D♯, F♯, A | B2, D♯3, A3, B3, F♯4 |
The octave numbers name sounding pitches, with middle C called C4. A chord can double a note or put its members in a different order from its construction formula. All three grips contain the complete four-note chord, with the root lowest.
Pick each intended string separately. Check that a neighbouring finger is not silencing an open string, and adjust your hand before adding pressure. Practise E7 to A7, E7 to B7 and B7 to A7 without a beat first. Release between attempts and stop if playing hurts. The chord-change lesson gives a separate two-chord drill.
Count the form before you strum it
Set the metronome to four beats per bar. Try 60 BPM, with one click for each numbered beat. Count an empty 1 2 3 4 before beginning; that count-in is preparation and is not bar 1 of the twelve-bar form.
First point to each box and say 1 2 3 4 without playing. Move to the next box on its next 1. You stay on E7 for four complete bars before A7 arrives at bar 5. The next landmarks are E7 at 7 and B7 at 9. Bars 9 to 12 change chord every bar.
If you lose your place, stop and find the bar number. Count a fresh empty bar, then restart at bar 1. You can practise bars 9 to 12 separately as a four-bar fragment, but that fragment is not a complete twelve-bar pass.
Play one chord attack per bar
The original practice score below uses 4/4 at quarter-note 60 BPM. Downstrum the intended strings once on beat 1 of every bar, including repeated E7 or A7 bars. Keep the fretted shape while the chord rings through 2, 3 and 4. Change to the next shape for its beat 1 without inserting an extra beat.
Twelve-bar blues in E: one attack per bar: score and practice
Twelve 4/4 bars at quarter-note 60 BPM. E7 in bars 1 to 4, A7 in 5 and 6, E7 in 7 and 8, then B7, A7, E7 and B7. Downstrum once on each bar's 1 and hold through 4. E7 uses all six strings; A7 and B7 use A through high E, stopping the old low E when leaving E7. Twelve chord attacks, 48 beats, 48 seconds excluding a manual count-in. After bar 12 beat 4, stop all strings on the following 1, or stop the old B7 and restart E7 there when repeating, without an extra beat. No count-in bar; grouped notes do not prescribe strum speed.
The score contains 12 played bars at 60 BPM, without a count-in. Follow the lesson's count-in and stopping instructions when you play. The guitar staff uses the usual octave-transposing treble convention; the tab gives the physical string and fret.
The static score is available without loading the player.
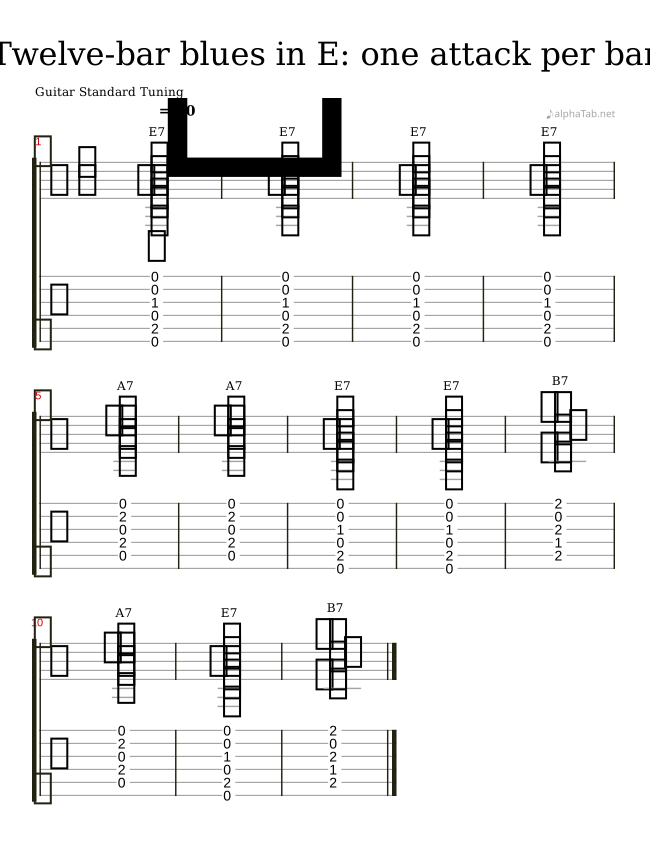
Scroll sideways for the complete score. Interactive notation loads when you ask for it. Practice audio loads separately and starts only after Play. Synthetic audio is a timing reference; it does not check your guitar or replace the instructions for stopping the strings.
| Bar | Chord | What to do |
|---|---|---|
| 1 | E7 | Strum all six on 1; let ring through 4. |
| 2 | E7 | Strum E7 again on 1; let ring through 4. |
| 3 | E7 | Strum E7 again on 1; let ring through 4. |
| 4 | E7 | Strum E7 again on 1; let ring through 4. |
| 5 | A7 | Change and strum A through high E on 1; let ring through 4. |
| 6 | A7 | Strum A7 again on 1; let ring through 4. |
| 7 | E7 | Change and strum all six on 1; let ring through 4. |
| 8 | E7 | Strum E7 again on 1; let ring through 4. |
| 9 | B7 | Change and strum A through high E on 1; let ring through 4. |
| 10 | A7 | Change and strum A through high E on 1; let ring through 4. |
| 11 | E7 | Change and strum all six on 1; let ring through 4. |
| 12 | B7 | Change and strum A through high E on 1; let ring through 4. |
Before adding a beat, rehearse stopping low E: strum E7, then lightly touch the low-E string with the side of your plucking hand until it stops ringing. Form A7 or B7 and strum from the A string. Avoiding low E on the new strum will not stop a note that is already ringing.
When leaving E7 for A7 or B7 in time, stop the old low-E string as you change; it is not part of the next voicing. Clear the old chord as the new one begins. Picking or strumming causes the new attack; changing the fretting grip alone does not replace it.
Each whole-note chord in the score lasts four quarter-note beats. Its stacked notes represent one chord attack; the score does not specify how quickly a pick crosses the strings. There are no extra attacks on 2, 3 or 4. This sparse part teaches the form before a more active accompaniment.
Finish or repeat after bar 12
For one pass, let bar 12’s B7 ring through beat 4, then gently touch all sounding strings on the following 1 to stop them. Do not add a strum. This stops the exercise on B7; it is not a composed final ending on E7.
To repeat, stop the old B7 as you return to E7 and downstrum E7 on that same following 1. It becomes bar 1 of the next pass; add no pause or extra bar. In the optional player, select “Repeat this 12-bar score” to repeat all twelve bars. The score contains no count-in bar.
One pass has twelve chord attacks and 48 quarter-note beats, taking 48 seconds at 60 BPM, excluding your count-in. Two passes have 24 attacks and 96 beats. If changes make you rush, stop and practise the grip separately, then restart with a fresh count-in at a slower tempo.
Recognise two common changes to the chart
A quick change puts A7 in bar 2 instead of E7, returning to E7 in bar 3. That changes the early harmony without adding a bar. It is a separate version; the score above keeps E7 in bar 2.
Another version keeps E7 in bar 12 instead of the B7 used here. The final B7 in this lesson helps lead into the next E7, while an E7 in bar 12 gives a different ending to the pass. Follow the chart supplied for the song or jam: “twelve-bar blues” does not guarantee every version has identical chords.
Changing the bar-12 chord alone does not write a complete song ending, and this lesson does not supply a turnaround lick. Learn the form first, then work on the rhythm or ending you actually need. Shuffle and swing describe beat subdivision and feel; the twelve-bar count describes the length and chord sequence. This example uses no eighth-note subdivisions.
Check your place in the form
- How many beats are in one bar here, and how many in one twelve-bar pass?
- Which chord begins bars 5, 7 and 9?
- In this version, what is bar 12, and what follows it when repeating?
- Do four consecutive E7 boxes last only four beats?
- Which string must stop when you leave E7 for A7 or B7?
- What changes in a quick-change version?
Check your answers
- Four quarter-note beats per bar, 48 per twelve-bar pass.
- A7 begins bar 5, E7 begins bar 7 and B7 begins bar 9.
- B7. Repeat at E7 in bar 1 on the next 1, without an extra beat or bar.
- No. Four boxes are four bars, sixteen beats. In this exercise you attack E7 on each bar’s 1.
- Low E, string 6. A7 and B7 start from A, string 5, in these voicings.
- Bar 2 becomes A7, then bar 3 returns to E7. There are still twelve bars.
For shorter loops before this form, use the beginner chord progressions. To understand which note you are playing inside each grip, revisit guitar fretboard notes. Keep the form steady before adding a lead part or a busier strum.
Source notes
Justin Sandercoe’s written 12-bar blues progressions shows the chosen I, IV and V form, a quick change and other variants. Robert Hutchinson’s 12-bar blues table shows a version ending on I, supporting the distinction at bar 12. Sandercoe’s open seventh chords supports the chord quality and open-shape approach. The numbered E7/A7/B7 map, exact pitch derivations and one-strum-per-bar practice score were prepared for this lesson. No source song, recording or artwork is reproduced.